Regular hearing aid maintenance is important for extending the life span, reducing breakdowns, ensuring clear sound, and preventing ear infections. If not cleaned, dirt and wax accumulate on the hearing aids and clog tiny openings and vents leading to low or distorted sounds. In this article, we will share valuable tips on hearing aid maintenance using easily accessible tools. Follow our hearing aid maintenance checklist and the hearing aid maintenance guide for proper care and maintenance of your hearing aids.
How Often Should A Hearing Aid Be Cleaned?
Ideally, hearing aid maintenance should be a daily activity immediately after you switch them off for the day. While a complete cleaning is not required daily, cleaning the shell or outer surface and earmolds or domes is necessary.
The frequency of detailed hearing aid cleaning depends on the environment you are exposed to. If you are exposed to dust and sweat, then cleaning hearing aids frequently will ensure a long working life.
Hearing Aid Maintenance Tools

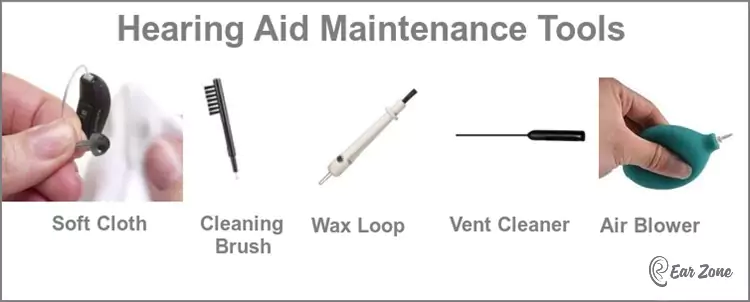
A few easily available hearing aid maintenance tools are required to clean a hearing aid at home and keep it in perfect working condition.
- A soft clean cloth or soft tissues
- Hearing aid cleaning brush
- Hearing aid wax removal tool. (Hearing aid wax loop or wax pick)
- Hearing aid vent cleaning tool
- Hand rubber air blower
Hearing Aid Maintenance Checklist
The hearing aid maintenance routine can be divided into daily, weekly, and checks by a professional.
Daily Hearing Aid Maintenance Checklist
If you work or spend most of your time outdoors, there is a high chance of sweat, dust, and grime settling on your hearing aids.
Some individuals produce more earwax than others, which can block the receiver (speaker) opening of your CIC, IIC hearing aid, or BTE earmold.
- Use a soft dry cloth or soft tissue to wipe the shell of your hearing aid.
- Visually check if earwax or dirt is blocking the sound outlet of your hearing aid
- Store your hearing aid in a dehumidifier. Remove the battery and leave the battery door open before placing it in the humidifier.
Weekly Hearing Aid Maintenance Checklist
Perform the following checks and cleaning tasks on a weekly basis:
- Check for an earwax deposit at the opening of your earmold. Use an earwax removal tool to dislodge the wax.
- For ITC, CIC, and IIC hearing aids and domes with wax guards, check for wax blockage. Wax guards cannot be cleaned, replace with a new wax guard. (Read how to remove ear wax from hearing aids?)
- Use the brush to clean the microphone cover, in most cases, the microphone covers do not need to be changed very often. (Read How to clean hearing aid microphone cover?)
- If your hearing aid or earmold has a vent, clean the vent using the vent cleaning tool
- If your hearing aid uses a replaceable battery, remove the battery and clean the inside of the battery compartment. Clean the battery contacts with a brush or a soft cloth. The dust on the battery contacts can cause an intermittent sound.
- Visually inspect your CIC or IIC hearing aids closely for cracks in the shell. Cracks are unlikely unless you have dropped them.
- Visually inspect your RIC hearing aid receiver wire. Ensure that the wire is not twisted or frayed.
- Visually inspect your BTE hearing aid shell and buttons. Ensure that the tubing is still soft. BTE tubing tends to become hard after some time. Hard and stiff tubing may not allow the earmold to remain in the ear.
You may face other issues with your hearing aids that are related to sound quality or feedback. We advise you to read our blog on hearing aid complaints and how to fix them.
Professional Hearing Aid Maintenance
It is advisable to visit your audiologist for proper checking of your hearing aids every six months. It is difficult for you or any hearing aid user to detect sound deterioration due to an aging microphone or receiver. An Audiologist may identify performance issues that you may have overlooked.
The audiologist may conduct an audiometry test and confirm whether the hearing aids need to be reprogrammed. Hearing loss increases over time, and hearing loss thresholds will keep changing.

How To Clean BTE Hearing Aids?
The outer shell of the hearing aid is exposed to dirt, sweat, and occasionally oil from your hands. It is important that you clean the outer shell and the earmold at the end of the day.
Use a soft dry cloth or a soft tissue to gently wipe the sweat and dirt. Daily hearing aid maintenance ensures that the dirt settled on the shell does not accumulate around tiny buttons and gaps.
Note: Do not use alcohol or any commercial cleaning spray or liquid unless recommended by the hearing aid manufacturer.
How To Clean a Hearing Aid Earmold?
BTE earmold cleaning is easy and convenient, the earmold can be removed, cleaned, and reused.
Hold the BTE ear hook firmly between your thumb and finger, use the other hand to hold the transparent tube, and slowly pull out the tube with the attached earmold from the hearing aid ear hook.
Note: Please make sure you are cleaning a BTE with the receiver (speaker) inside the hearing aid body. The RIC hearing aid looks similar to a BTE, but the receiver is outside the hearing aid body at the end of the tube. Do not pull the RIC tube, Instructions for RIC hearing aid maintenance are given below.
How to Clean Hearing Aid Domes?
Hearing aid domes are mostly used with an RIC or an Open Fit type of hearing aids. The domes are fitted at the end of the thin tube in an open fit hearing aid. In case, you notice earwax blocking the opening, use a hearing aid cleaning brush or a wax removal tool to gently remove the wax.
In most cases domes can be removed, and it is advisable to gently pull off the dome and clean it.
How To Remove Ear Wax from Hearing Aids?
Take a closer look at the opening of the BTE earmold, if the earwax is still visible and you have not been able to clean it, follow these steps:
- Take some water mixed with mild soap in a bowl
- Immerse the tube and the earmold in the water, the soapy water will dislodge the dirt and oil accumulated on and in the earmold opening.
- Dry the earmold before attaching it back to the hearing aid. Preferably, leave it overnight to dry or use a rubber blow pump or hair dryer with the heat set at minimum or no heat.
Note: Do not expose the hearing aid to water.
How To Remove Tube from Hearing Aid?
In BTE hearing aids, the silicone tube is pushed over the ear hook at the hearing aid end and over the elbow at the earmold end. Some earmold manufacturers use bent tubes that are embedded and fixed inside the earmold. In this case, the tube cannot be removed from the earmold end.
Twist the tube at the hearing aid end with one hand while holding the ear hook firmly with the other end. After a few twists and turns, the tube will come off.
How to Remove Thin Tube from Hearing Aid?
Open fit type of hearing aid has a thin tube with a threaded or locking type connecter. Accordingly, the thin tube can be unscrewed or unlocked.
How Do You Clean Hearing Aid Tubes?
Since you have removed the silicone tube and earmold from the hearing aid, you can leave the hearing aid tube in soapy water. if the tubes are still not clean, use a wax removal tool to clear the wax.
How To Remove Moisture from Hearing Aid Tube
You may notice moisture or condensation in your hearing aid tube. This generally happens if you move from a hot outdoor environment to an air-conditioned room. Use a hand rubber air blower to blow out the moisture, or you can also use a hair dryer.
How To Clean Hearing Aid Microphone Cover?
The hearing aid microphone is covered with a very fine mesh that allows sound to pass through but prevents the dust particles from entering and damaging the microphone. Over time dust particles block the mesh and your hearing aid sound may be low or distorted.
Please refer to your hearing aid manual for instructions on how to remove the microphone cover. Clean the microphone cover using a brush, if the low sound persists, replace the microphone cover with a new one. Hearing aid manufacturers supply spare mic covers.
How To Clean Hearing Aid Filters?
Hearing aid filters or hearing aid wax guards prevent earwax from reaching the receiver or speaker. Wax guards cannot be cleaned and should be replaced. Visually inspect the filters if you notice a drop in the sound output. Always keep a set of spare wax guards.
How To Remove Wax Guard from Hearing Aid?
Wax guards are provided by the manufacturer along with an application stick. Usually, one end of the stick is used to remove the old wax guard and the other end is used to fix the new wax guard. Please refer to your hearing aid manual for instructions.
Proper hearing aid maintenance is important for optimizing performance and extending the working life span of hearing aids. Although the home hearing aid maintenance tips will keep your hearing aids trouble-free, do approach your audiologist if you encounter a persistent issue.
Reference:


